Posts

Showing posts from 2012

Sendmail: Bypass DNS and Forward Emails to Smart Host

Scenario: We need a dumb mail server that would forward all outgoing mails (originated in the server) to a relay host/smart host. We don't want our mail server to do any DNS queries (we leave the noble task for the smart host, after all, he's "smart"). Here's how it's done in sendmail- Create a new file in the / etc/mail directory vim /etc/mail/service.switch ####### start of file ######### hosts files aliases files ####### end of file ########### We add the "relay host" IP to sendmail.mc vim /etc/mail/sendmail.mc define(`SMART_HOST',`192.168.2.250')dnl ### obviously, replace the relay host address based on your requirements ### end ### m4 /etc/mail/senmdmail.mc > /etc/mail/sendmail.cf service sendmail restart NOTE : Make sure there is no dnl in the beginning of the line. The compiler will treat any starting with dnl as a comment. And it's done. Now our mail server will not do any DNS queries and forward all o

Password Protecting Grub

Image
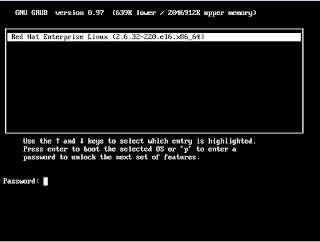
To protect grub using md5 encrypted password, we can use this simple technique- [root@zimbra ~]# grub-md5-crypt Password: Retype password: $1$zsPMx0$DkhqPFB1ouY/W7uhvCJZL1  This command generates a MD5 encrypted password that will be added to the file grub.conf . Here is my sample file- [root@zimbra ~]# vim /etc/grub.conf ##################################################################################### default=0 timeout=5 splashimage=(hd0,0)/grub/splash.xpm.gz password --md5 $1$zsPMx0$DkhqPFB1ouY/W7uhvCJZL1 hiddenmenu title Red Hat Enterprise Linux (2.6.32-220.el6.x86_64) root (hd0,0) kernel /vmlinuz-2.6.32-220.el6.x86_64 ro root=/dev/mapper/vg_zimbra-lv_root rd_NO_LUKS rd_LVM_LV=vg_zimbra/lv_root LANG=en_US.UTF-8 rd_NO_MD quiet SYSFONT=latarcyrheb-sun16 rhgb crashkernel=auto rd_LVM_LV=vg_zimbra/lv_swap KEYBOARDTYPE=pc KEYTABLE=us rd_NO_DM initrd /initramfs-2.6.32-220.el6.x86_64.img And we are ready. The system can be rebooted safely, and will

OTRS Tuning: Part 5 - Customers

Image
OTRS has its own database for managing customers. Yet another great feature. Adding new customer Whenever a ticket is created, a mail is automatically sent to the email address of the customer. Moreover, the customer has a portal through which he can raise new tickets, view open tickets as well as view history of closed tickets. The customer portal can be accessed using the link http://IP/otrs/customer.pl Customer Portal

OTRS Tuning: Part 4 - Managing Ticket States

Image
A wonderful feature about OTRS is that we can actually create different states for tickets as our requirements. The steps are really easy. Admin > States Overview: Ticket States

OTRS Tuning: Part 4 - Managing Responses

Image
We can set a couple of predefined responses that may be used while responding to tickets, so that we don't need to type the same thing over and over again. For example, I have created two responses - one for updating tickets and one for closing tickets. Overview: Response (Admin > Responses) New Response: Update New Response: Close Assign Response to Queue (Responses <-> Queues Assign Response to Queues

OTRS Tuning: Part 3 - Managing Salutations, Signatures and Queues

Image
OTRS supports custom Salutations and Signatures, that will be used with each ticket. Furthermore, OTRS also supports Queues to categorize tickets. For example, we can have separate queues for bandwidth problems, separate queues for routing problems. This way, all the tickets may sorted out based on nature of problem and different agents may be assigned to different queues so that the ticket is handled efficiently. Here's how we can manipulate them- Salutations Admin > Salutations Custom Salutation Signatures Custom Signature ( Admin > Signatures)  Queues New Queue (Admin > Queues) While adding the queue Make sure that the queue is assigned to the proper group Proper system email address Proper Salutation Proper Signature

OTRS Tuning: Part 2 - Setting Up Sender Email

Image
I am assuming that the there is a valid domain with a working mail server. Here's how the sender email is set - Admin > Email Addresses Setting up Email Address

OTRS Tuning: Part 1 - Agents and Roles

Image
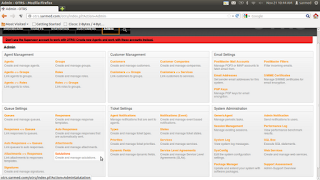
I'm attaching snapshots of basic OTRS Server tuning. OTRS is highly customizable, and I would recommend you to explore the application to find out all the available options. Part 1: Accessing Login Screen OTRS login page for users can be accessed using the link: http://IP/otrs/index.pl Default admin username: root@localhost Default admin password: root Part 2: The Dashboard and Admin Page Dashboard Part 3: Creating Roles and Agents Roles and agents are necessary to define which user can do what.We will be creating separate agents and roles, and assign agents to specific roles. Overview: Roles (Admin > Roles) Creating New Role Overview: Agents (Admin > Agents) Creating New Agents Assigning Roles to Groups ( Admin > Roles <-> Groups ) Assigning Roles to Groups Assigning Roles to Agents (Admin > Roles <-> Agents) Assigning Roles to Agents

OTRS on CentOS 6: Setting up the System

Image
In this post, we will be discussing about setting up OTRS, an open source helpdesk/ticketing system. It is a web based application, which is very handy, as I personally found it robust, client database support, email notifications and automatic ticket escalations. For more details about OTRS, this site can be checked http://www.otrs.com/en/ In this post, we will be demonstrating how to set up the system. Configuring and tuning would be discussed in later posts. Phase 1: Setting up packages I have said it before, and I will say it again, adding repoforge repository for yumserver is a very good idea. This link may be helpful: http://repoforge.org/use/ yum install wget mysql-server mysql php-mysql httpd perl-URI perl-Net-DNS perl-IO-Socket-SSL perl-XML-Parser mod_perl perl-TimeDate perl-Net-DNS procmail Phase 2: Installing OTRS Just googling would give us a tons of link to download OTRS. I am providing with a copy that I uploaded to my Ubuntu One. wget http://ubuntuone.com

Smokeping: Password Protecting

In this post, we will be looking at how to password protect Smokeping. As you may know, Smokeping pages are usually not password protected and can be viewed by anyone by defauly. Limit the view to a limited number of users, either of the following ways are possible- Using the web server configuration file to set passwords Using htaccess to set passwords According to Apache, using .htaccess should be avoided whenever possible, as .htaccess may hamper the web server performance ( Source ). Apache recommends using the web server configuration files for setting up passwords. Here's how it's done. (I am using an Ubuntu Server) Phase 1: Creating the password file. mkdir /etc/apache2/passwd htpasswd -c /etc/apache2/passwd/passwords username The -c is used to create a new user. This parameter can be omitted to change the password of an existing user. Phase 2: Modifying Smokeping Directives vim /etc/apache2/conf.d/smokeping ### Modify the following directives as nec

Changing mySQL root password

Here, we assume that the root password of mySQL is known. This tutorial has nothing to do with resetting forgotten root password. If we already know the root password of a mySQL database, here's how it can be changed - mysqladmin -u root -pcurrentpassword password 'newpassword' keep in mind that there is no space after the -p parameter. Hope this helps. ^_^

Observium vs. Cacti

I have deployed observium in an Ubuntu (12.04) today. I have stumbled upon observium while searching for Network Monitoring software, and the demo seemed pretty impressive. The installation was not very hard, and observium has been running quite smoothly. Below, I give my opinion - Both observium and cacti have similar graph. But observium gives cool previews when the cursor is placed over the graph. observium has tool for real time graph ( with update interval as low as 1 sec O_O ) whereas cacti graphs are updated every 5 minutes. observium is an auto-discovery program, whereas in cacti, every graph has to be manually added. By auto-discovery, I mean that whenever a device is added, all possible graphs are automatically generated. Both observium and cacti provide a lot of customization for user access. Still, I think I will be continuing using cacti. The main reason behind this decision is- observium can not work without proper DNS. Actually, auto-discovery protocol states t

Custom Mail Log Rotation Script

Thanks to google, I was able to find a command to create files as filename_DATE. Usually, all logs are automatically rotated if logrotate is installed. However, I’m creating a custom script to rotate mail logs. Thought I'd share. ^_^ Paste your text here.# vim /root/rotate ##### this script will be used by crond to rotate mail log ##### #!/bin/sh /etc/init.d/postfix stop /etc/init.d/dovecot stop cat /var/log/maillog > "/var/log/maillog_`date '+%d-%m-%Y'`" echo > /var/log/maillog gzip "/var/log/maillog_`date '+%d-%m-%Y'`" /etc/init.d/postfix start /etc/init.d/dovecot start ##### end of script ##### # chmod 744 /root/rotate CRON # crontab -e #### run the script every 10 days #### 00 00 */10 * * /root/rotate :wq /etc/init.d/crond restart

Ipplan on CentOS 6

Image
Ipplan is a cool piece of open source software that can be used to manage IP. It can be used by both Service Providers to maintain their IP block leased from RIRs, as well as by private organizations to keep track of the IP addresses in their LAN. It is a web based application, and setting up is not a tough job. I will be using a CentOS6 box and unzip method. Mysql, php and httpd is needed to run Ipplan. Setting up the dependencies [root@localhost ~]# yum install httpd php-mysql mysql-server php-common unzip php php-cli wget Now that the necessary softwares are installed, time to start 'em. [root@localhost ~]# service httpd start; service mysqld start; chkconfig httpd on; chkconfig mysq Downloading Package Ipplan can be downloaded using the following link [root@localhost ~]# wget http://downloads.sourceforge.net/project/iptrack/ipplan-win/Release%204.92/ipplan-4.92a.zip?r=http%3A%2F%2Fnews.mali77.com%2Findex.php%2F2011%2F03%2Finstalling-ippla

Nagios: Monitoring a custom

I'm using Debian 6 and Nagios3. Sometimes, it becomes essential to monitor a non-standard port in Nagios. An example may be monitoring TCP port 5555. Before we start, there is something that needs to be known-  Nagios has included a bunch of custom command. The commands are defined in the directory /etc/nagios-plugins/config / The executable for these defined commands are located in /usr/lib/nagios/plugins/ Since we want to monitor a custom TCP port, we will use Nagios's existing TCP checking tool. We will just add port 5555 as an argument to the command. Checking root@dragonfly:~# /usr/lib/nagios/plugins/check_tcp -H 192.168.10.2 -p 5555 TCP OK - 0.001 second response time on port 55|time=0.000502s;;;0.000000;10.000000 So, we can certainly conclude that port 5555 is accessible. Defining the command vim /etc/nagios-plugins/config/tcp_udp.cfg #### ADD THE CUSTOM SECTION #### define command{ command_name check_tcp_5555 command_line $USER1$/c

GUI Grub Customizer for Ubuntu

Image
For those who want a GUI to easily maintain grub entries, for example, to change the default OS to be booted, here is a handy tool - sudo add-apt-repository ppa:danielrichter2007/grub-customizer sudo apt-get update sudo apt-get install grub-customizer Here's a thumbnail. Grub Customizer Hope this helps.

Secondary DNS Server in CentOS 6

Please consult this article to check how the primary DNS Server is configured in chroot environment. A secondary DNS Server is used as a backup DNS Server in case the primary fails. The configuration is almost identical. Here are the details: Domain: testdom.inv Primary: ns1.testdom.inv (192.168.1.13) Secondary: ns2.testdom.inv (192.168.1.14)   Secondary DNS Server Phase1: Again, the host names must be properly specified. We have to modify the following lines in the mentioned files - [root@centu ~]# vim /etc/sysconfig/network HOSTNAME=ns2.testdom.inv [root@ns2 ~]# vim /etc/hosts 192.168.1.14 ns2.testdom.inv ns2 Finally, we set the resolver IP to the primary DNS Server [root@ns2 ~]# vim /etc/resolv.conf nameserver 192.168.1.13 nameserver 192.168.1.14    Phase 2: Now we set up necessary packages - [root@ns2 ~]# yum install bind bind-chroot Loaded plugins: fastestmirror, presto Determining fastest mirrors Setting up Install Process Resol

Primary DNS Configuration in CentOS 6 (with chroot)

This tutorial is based on a previous  article . The configuration of the DNS Servers using chroot and not using chroot are almost identical. Here's how it's done -   Objective We would be configuring the primary DNS Server for the domain testdom.inv (yes, the top level domain is inv i.e. 'invalid').  The FQDN (Fully Qualified Domain Name) of the server is ns1.testdom.inv . This is a simulation , so you better get your Server off the Internet- make sure the Server does not have any real IP make sure that the file /etc/resolv.conf does not contain any IP address of a valid DNS Server. Here is the IP Database DNS Server 192.168.1.13 Web Server 192.168.1.12 FTP Server 192.168.1.11 Procedure Phase1: The first thing when it comes to configuring any Server is setting up the hostname of the Server properly. We have to modify the following lines in the mentioned files - [root@centu ~]# vim /etc/sysconfig/n