How to turn your CentOS box into a BGP router using Quagga
I had originally written this article for xmodulo.
In a previous tutorial, I described how we can easily turn a Linux box into a fully-fledged OPSF router using Quagga, an open source routing software suite. In this tutorial, I will focus on converting a Linux box into a BGP router, again using Quagga, and demonstrate how to set up BGP peering with other BGP routers.
Before we get into details, a little background on BGP may be useful. Border Gateway Protocol (or BGP) is the de-facto standard inter-domain routing protocol of the Internet. In BGP terminology, the global Internet is a collection of tens of thousands of interconnected Autonomous Systems (ASes), where each AS represents an administrative domain of networks managed by a particular provider.
To make its networks globally routable, each AS needs to know how to reach all other ASes in the Internet. That is when BGP comes into play. BGP is the language used by an AS to exchange route information with other neighboring ASes. The route information, often called BGP routes or BGP prefixes, contains AS number (ASN; a globally unique number) and its associated IP address block(s). Once all BGP routes are learned and populated in local BGP routing tables, each AS will know how to reach any public IP addresses on the Internet.
The ability to route across different domains (ASes) is the primary reason why BGP is called an Exterior Gateway Protocol (EGP) or inter-domain routing protocol. Whereas routing protocols such as OSPF, IS-IS, RIP and EIGRP are all Interior Gateway Protocols (IGPs) or intra-domain routing protocols which are responsible for routing within one domain.
Test Scenarios
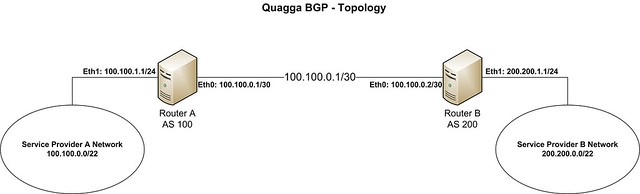
For this tutorial, let us consider the following topology.
We assume that service provider A wants to establish a BGP peering with service provider B to exchange routes. The details of their AS and IP address spaces are like the following.
- Service provider A: ASN (100), IP address space (100.100.0.0/22), IP address assigned to eth1 of a BGP router (100.100.1.1)
- Service provider B: ASN (200), IP address space (200.200.0.0/22), IP address assigned to eth1 of a BGP router (200.200.1.1)
Router A and router B will be using the 100.100.0.0/30 subnet for connecting to each other. In theory, any subnet reachable from both service providers can be used for interconnection. In real life, it is advisable to use a /30 subnet from service provider A or service provider B's public IP address space.
Installing Quagga on CentOS
If Quagga is not already installed, we install Quagga using yum.
# yum install quagga
If you are using CentOS 7, you need to apply the following policy change for SELinux. Otherwise, SELinux will prevent Zebra daemon from writing to its configuration directory. You can skip this step if you are using CentOS 6.
# setsebool -P zebra_write_config 1
The Quagga software suite contains several daemons that work together. For BGP routing, we will focus on setting up the following two daemons.
- Zebra: a core daemon responsible for kernel interfaces and static routes.
- BGPd: a BGP daemon.
Configuring Logging
After Quagga is installed, the next step is to configure Zebra to manage network interfaces of BGP routers. We start by creating a Zebra configuration file and enabling logging.
# cp /usr/share/doc/quagga-XXXXX/zebra.conf.sample /etc/quagga/zebra.conf
On CentOS 6:
# service zebra start
# chkconfig zebra on
# chkconfig zebra on
For CentOS 7:
# systemctl start zebra
# systemctl enable zebra
# systemctl enable zebra
Quagga offers a dedicated command-line shell called vtysh, where you can type commands which are compatible with those supported by router vendors such as Cisco and Juniper. We will be using vtysh shell to configure BGP routers in the rest of the tutorial.
To launch vtysh command shell, type:
# vtysh
The prompt will be changed to hostname, which indicates that you are inside vtysh shell.
Router-A#
Now we specify the log file for Zebra by using the following commands:
Router-A# configure terminal
Router-A(config)# log file /var/log/quagga/quagga.log
Router-A(config)# exit
Router-A(config)# log file /var/log/quagga/quagga.log
Router-A(config)# exit
Save Zebra configuration permanently:
Router-A# write
Repeat this process on Router-B as well.
Configuring Peering IP Addresses
Next, we configure peering IP addresses on available interfaces.
Router-A# show interface
Interface eth0 is up, line protocol detection is disabled
. . . . .
Interface eth1 is up, line protocol detection is disabled
. . . . .
Configure eth0 interface's parameters:
site-A-RTR# configure terminal
site-A-RTR(config)# interface eth0
site-A-RTR(config-if)# ip address 100.100.0.1/30
site-A-RTR(config-if)# description "to Router-B"
site-A-RTR(config-if)# no shutdown
site-A-RTR(config-if)# exit
site-A-RTR(config)# interface eth0
site-A-RTR(config-if)# ip address 100.100.0.1/30
site-A-RTR(config-if)# description "to Router-B"
site-A-RTR(config-if)# no shutdown
site-A-RTR(config-if)# exit
Go ahead and configure eth1 interface's parameters:
site-A-RTR(config)# interface eth1
site-A-RTR(config-if)# ip address 100.100.1.1/24
site-A-RTR(config-if)# description "test ip from provider A network"
site-A-RTR(config-if)# no shutdown
site-A-RTR(config-if)# exit
site-A-RTR(config-if)# ip address 100.100.1.1/24
site-A-RTR(config-if)# description "test ip from provider A network"
site-A-RTR(config-if)# no shutdown
site-A-RTR(config-if)# exit
Now verify configuration:
Router-A# show interface
Interface eth0 is up, line protocol detection is disabled
  Description: "to Router-B"
  inet 100.100.0.1/30 broadcast 100.100.0.3
Interface eth1 is up, line protocol detection is disabled
  Description: "test ip from provider A network"
  inet 100.100.1.1/24 broadcast 100.100.1.255
Router-A# show interface description
Interface       Status  Protocol  Description
eth0            up      unknown   "to Router-B"
eth1            up      unknown   "test ip from provider A network"
If everything looks alright, don't forget to save.
Router-A# write
Repeat to configure interfaces on Router-B as well.
Before moving forward, verify that you can ping each other's IP address.
Router-A# ping 100.100.0.2
PING 100.100.0.2 (100.100.0.2) 56(84) bytes of data.
64 bytes from 100.100.0.2: icmp_seq=1 ttl=64 time=0.616 ms
Next, we will move on to configure BGP peering and prefix advertisement settings.
Configuring BGP Peering
The Quagga daemon responsible for BGP is called bgpd. First, we will prepare its configuration file.
# cp /usr/share/doc/quagga-XXXXXXX/bgpd.conf.sample /etc/quagga/bgpd.conf
On CentOS 6:
# service bgpd start
# chkconfig bgpd on
# chkconfig bgpd on
For CentOS 7
# systemctl start bgpd
# systemctl enable bgpd
# systemctl enable bgpd
Now, let's enter Quagga shell.
# vtysh
First verify that there are no configured BGP sessions. In some versions, you may find a BGP session with AS 7675. We will remove it as we don't need it.
Router-A# show running-config
... ... ...
router bgp 7675
 bgp router-id 200.200.1.1
... ... ...
We will remove any pre-configured BPG session, and replace it with our own.
Router-A# configure terminal
Router-A(config)# no router bgp 7675
Router-A(config)# router bgp 100
Router-A(config)# no auto-summary
Router-A(config)# no synchronizaiton
Router-A(config-router)# neighbor 100.100.0.2 remote-as 200
Router-A(config-router)# neighbor 100.100.0.2 description "provider B"
Router-A(config-router)# exit
Router-A(config)# exit
Router-A# write
Router-B should be configured in a similar way. The following configuration is provided as reference.
Router-B# configure terminal
Router-B(config)# no router bgp 7675
Router-B(config)# router bgp 200
Router-B(config)# no auto-summary
Router-B(config)# no synchronizaiton
Router-B(config-router)# neighbor 100.100.0.1 remote-as 100
Router-B(config-router)# neighbor 100.100.0.1 description "provider A"
Router-B(config-router)# exit
Router-B(config)# exit
Router-B# write
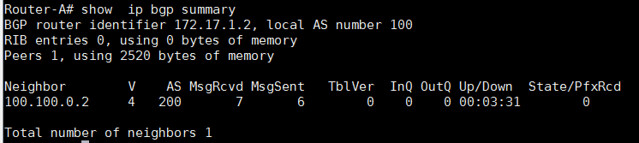
When both routers are configured, a BGP peering between the two should be established. Let's verify that by running:
Router-A# show ip bgp summary
In the output, we should look at the section "State/PfxRcd." If the peering is down, the output will show 'Idle' or 'Active'. Remember, the word 'Active' inside a router is always bad. It means that the router is actively seeking for a neighbor, prefix or route. When the peering is up, the output under "State/PfxRcd" should show the number of prefixes received from this particular neighbor.
In this example output, the BGP peering is just up between AS 100 and AS 200. Thus no prefixes are being exchanged, and the number in the rightmost column is 0.
Configuring Prefix Advertisements
As specified at the beginning, AS 100 will advertise a prefix 100.100.0.0/22, and AS 200 will advertise a prefix 200.200.0.0/22 in our example. Those prefixes need to be added to BGP configuration as follows.
On Router-A:
Router-A# configure terminal
Router-A(config)# router bgp 100
Router-A(config)# network 100.100.0.0/22
Router-A(config)# exit
Router-A# write
Router-A(config)# router bgp 100
Router-A(config)# network 100.100.0.0/22
Router-A(config)# exit
Router-A# write
On Router-B:
Router-B# configure terminal
Router-B(config)# router bgp 200
Router-B(config)# network 200.200.0.0/22
Router-B(config)# exit
Router-B# write
Router-B(config)# router bgp 200
Router-B(config)# network 200.200.0.0/22
Router-B(config)# exit
Router-B# write
At this point, both routers should start advertising prefixes as required.
Testing Prefix Advertisements
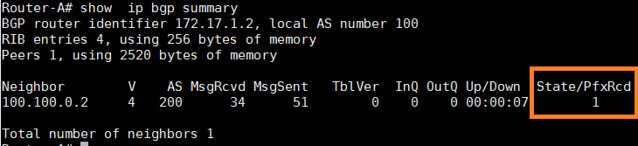
First of all, let's verify whether the number of prefixes has changed now.
Router-A# show ip bgp summary
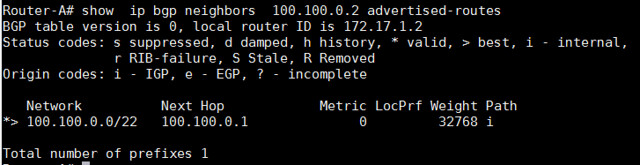
To view more details on the prefixes being received, we can use the following command, which shows the total number of prefixes received from neighbor 100.100.0.2.
Router-A# show ip bgp neighbors 100.100.0.2 advertised-routes
To check which prefixes we are receiving from that neighbor:
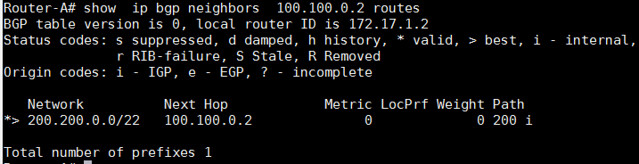
Router-A# show ip bgp neighbors 100.100.0.2 routes
We can also check all the BGP routes:
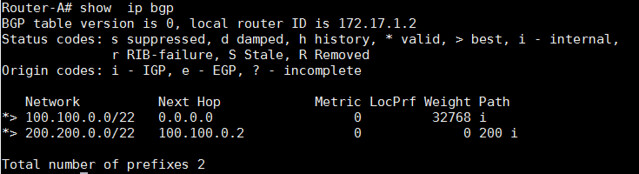
Router-A# show ip bgp
These commands below can be used to check which routes in the routing table are learned via BGP.
Router-A# show ip route
Codes: K - kernel route, C - connected, S - static, R - RIP, O - OSPF,
       I - ISIS, B - BGP, > - selected route, * - FIB route

C>* 100.100.0.0/30 is directly connected, eth0
C>* 100.100.1.0/24 is directly connected, eth1
B>* 200.200.0.0/22 [20/0] via 100.100.0.2, eth0, 00:06:45
Router-A# show ip route bgp
B>* 200.200.0.0/22 [20/0] via 100.100.0.2, eth0, 00:08:13
The BGP-learned routes should also be present in the Linux routing table.
[root@Router-A~]# ip route
100.100.0.0/30 dev eth0  proto kernel  scope link  src 100.100.0.1
100.100.1.0/24 dev eth1  proto kernel  scope link  src 100.100.1.1
200.200.0.0/22 via 100.100.0.2 dev eth0  proto zebra
Finally, we are going to test with ping command. ping should be successful.
[root@Router-A~]# ping 200.200.1.1 -c 2
To sum up, this tutorial focused on how we can run basic BGP on a CentOS box. While this should get you started with BGP, there are other advanced settings such as prefix filters, BGP attribute tuning such as local preference and path prepend. I will be covering these topics in future tutorials.
Hope this helps.
Comments
Post a Comment