Posts

Showing posts from 2011

OSPF Simulation using Quagga

Image
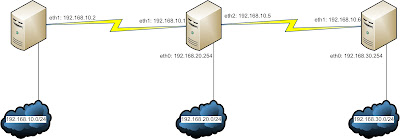
There's a newer version of this article available in my blog. Scenario   IP Details All the Routers in the diagram are actually Debian Machines. Router Alpha: eth0: 192.168.10.254/24 eth1: 10.0.0.2/30 Router Beta: eth0: 192.168.20.254/24 eth1: 10.0.0.1/30 eth2: 10.0.0.5/30 Router Gamma: eth0: 192.168.30.254/24 eth1: 10.0.0.6/30 Objective We would be configuring the Linux boxes with dynamic routing protocol OSPF for total connectivity. This would be done with the help of Quagga. Router Alpha Configuration root@alpha:~# apt-get install quagga First, we have to enable the routing protocols needed. root@alpha:~# cd /etc/quagga/ root@alpha:~# vim daemons zebra=yes bgpd=no ospfd=yes ospf6d=no ripd=no ripngd=no isisd=no Next, we would be configuring the interface parameters. Keep in mind, there are example configuration files stored in /usr/share/doc/quagga/examples. root@alpha:

RSYNC with Different Port

If SSH is not listening to the default port 22, then naturally we can not use RSYNC without specifying the SSH port. For example, if SSH is listening to port 4321, RSYNC can be used like this - # rsync -av -e "ssh -p 4321"   source_file   user@IP:/destination Hope it helps.

Backing up with RSYNC

Backing up with RSYNC RSYNC is a program that is widely used for backing up data. RSYNC is able to create full, as well as incremental backups, and is pretty easy to use. Moreover, RSYNC can also be used to backup data into remote machines. When backing up to remote machine, RSYNC can utilize SSH which means the communication is being protected by one of the world’s strongest protections. Here’s how RSYNC can be used – Objective All files in the directory /original needs to be backed up at /backup . The process must be repeated every 10 days. The directory /backup needs to be backed up at 192.168.10.254:/backup2 . The process must be repeated every 15 days. Phase 1: We are using the –a option for ‘ archive’ . Archive is used to preserve permissions. The –v option is used for ‘verbose’ output. root@firefly:~# ls -l /original/ total 0 -rw-r--r-- 1 root root 0 Dec 21 19:40 f1 -rw-r--r-- 1 root root 0 Dec 21 19:40 f2 -rw-r--r-- 1 root root 0 Dec 21 19:40 f3

SSH Login Without Passwords (Alternate SSH Port)

Many people don't use the default SSH port 22 for security purposes. In such case, when sharing the public key with a remote host, the following command can be used - root@localhost:~# ssh-copy-id -i id_dsa.pub '-p 1234 root@192.168.12.253' Should work. enjoy :)

SSH login without passwords

SSH Private-Public Key Pair Login Everyone would agree with the fact that SSH is the most widely used remote access protocol used in Linux based operating systems. The primary reason behind the popularity of SSH is, it utilizes one way encryption, supports many encryption algorithms as well as pre-shared keys for authentication. There are a couple of remote file sharing software that rely on SSH for protection like SCP, SFTP, RSYNC. Among them, RSYNC is really popular for taking backups. But because RSYNC to a remote host relies on SSH, and SSH prompts for a password, automating the backup process cannot be done with default settings. Here is where private-public key pair kicks in to save the day. With the help of the key pair, it is possible to utilize SSH to a remote host without using passwords. The methodology is pretty simple. HostA generates a private and public key pair. While generating the pair, no passphrases are used because the objective is to enable SSH wit

Adding Persistent Static Routes in Debian

Stumbled upon this just a while ago... Adding a static Route in Debian can be easily done by using the command route add -net 192.168.2.0 netmask 255.255.255.0 gw 192.168.1.2 dev eth1 Here, the network 192.168.2.0 is accessible through next hop 192.168.1.2 exit interface eth1. However, the problem is that the system forgets the route if the network service restarts. Here's how the route can be made permanent - # The primary network interface auto eth1 allow-hotplug eth1 iface eth1 inet static     address 192.168.1.3     netmask 255.255.255.0 up route add -net 192.168.2.0 netmask 255.255.255.0 gw 192.168.1.2 dev eth1 up route add -net 192.168.10.0 netmask 255.255.255.0 gw 192.168.1.2 dev eth1 down route del -net 192.168.2.0 netmask 255.255.255.0 gw 192.168.1.2 dev eth1 down route del -net 192.168.10.0 netmask 255.255.255.0 gw 192.168.1.2 dev eth1 The route is would now be updated every time the network service is restarted. Works like a charm :)

Common Squid Requirements - Part 2

7. Set Maximum Download Size To set the maximum size of a file to be downloaded, the parameter reply_body_max_size can be used. The size is calculated in bytes . For example, if the maximum size of download is 50 MB (50*1024*1024 = 52428800), then here's how it is done- root@firefly:~# vim squid.conf #### Declaring the ACL #### acl our_network src 192.168.10.0/24 acl vip src 192.168.10.100 #### Applying the ACL #### #### Again, the sequence is important #### reply_body_max_size 0 allow vip #### the vip has no size restrictions #### reply_body_max_size 52428800 deny our_network #### no one in our LAN can download files larger than the limit #### root@firefly :~# squid -k reconfigure #### this command can be used to tune squid with last configuration without restarting ####   8.Setting Specific Time/Date for Internet Access The following lines have been taken from the