How to analyze Squid logs with SARG log analyzer on CentOS
I originally wrote this tutorial for xmodulo.com
In a previous tutorial, we show how to configure a transparent proxy with Squid on CentOS. Squid provides many useful features, but analyzing a raw Squid log file is not straightfoward. For example, how could you analyze the time stamps and the number of hits in the following Squid log?
1404788984.429   1162 172.17.1.23 TCP_MISS/302 436 GET http://facebook.com/ - DIRECT/173.252.110.27 text/html
1404788985.046  12416 172.17.1.23 TCP_MISS/200 4169 CONNECT stats.pusher.com:443 - DIRECT/173.255.223.127 -
1404788986.124    174 172.17.1.23 TCP_MISS/200 955 POST http://ocsp.digicert.com/ - DIRECT/117.18.237.29 application/ocsp-response
1404788989.738    342 172.17.1.23 TCP_MISS/200 3890 CONNECT www.google.com:443 - DIRECT/74.125.200.106 -
1404788989.757    226 172.17.1.23 TCP_MISS/200 942 POST http://clients1.google.com/ocsp - DIRECT/74.125.200.113 application/ocsp-response
1404788990.839   3939 172.17.1.23 TCP_MISS/200 78944 CONNECT fbstatic-a.akamaihd.net:443 - DIRECT/184.26.162.35 -
1404788990.846   2148 172.17.1.23 TCP_MISS/200 118947 CONNECT fbstatic-a.akamaihd.net:443 - DIRECT/184.26.162.35 -
1404788990.849   2151 172.17.1.23 TCP_MISS/200 76809 CONNECT fbstatic-a.akamaihd.net:443 - DIRECT/184.26.162.35 -
1404788991.140    611 172.17.1.23 TCP_MISS/200 110073 CONNECT fbstatic-a.akamaihd.net:443 - DIRECT/184.26.162.35 –
SARG (or Squid Analysis Report Generator) is a web based tool that creates reports from Squid logs. SARG provides an easy-to-understand view of network traffic handled by Squid, and it is very easy to set up and maintain. In the following tutorial, we show how to set up SARG on a CentOS platform.
We start the process by installing necessary dependencies using yum.
# yum install gcc make wget httpd crond
Necessary services are started and loaded at startup.
# service httpd start; service crond start
# chkconfig httpd on; chkconfig crond on
# chkconfig httpd on; chkconfig crond on
Now we download and extract SARG.
# wget http://downloads.sourceforge.net/project/sarg/sarg/sarg-2.3.8/sarg-2.3.8.tar.gz?
# tar zxvf sarg-2.3.8.tar.gz
# cd sarg-2.3.8
# tar zxvf sarg-2.3.8.tar.gz
# cd sarg-2.3.8
NOTE: For 64-bit Linux, the source code in log.c needs to be patched as follows.
1
2
3
4
5
6
7
8
9
10
11
12
| 1506c1506< if (fprintf(ufile->file, "%s\t%s\t%s\t%s\t%"PRIi64"\t%s\t%ld\t%s\n",dia,hora,ip,url,nbytes,code,elap_time,smartfilter)<=0) {---> if (fprintf(ufile->file, "%s\t%s\t%s\t%s\t%"PRIi64"\t%s\t%ld\t%s\n",dia,hora,ip,url,(int64_t)nbytes,code,elap_time,smartfilter)<=0) {1513c1513< fprintf(fp_log, "%s\t%s\t%s\t%s\t%s\t%"PRIi64"\t%s\t%ld\t%s\n",dia,hora,user,ip,url,nbytes,code,elap_time,smartfilter);---> fprintf(fp_log, "%s\t%s\t%s\t%s\t%s\t%"PRIi64"\t%s\t%ld\t%s\n",dia,hora,user,ip,url,(int64_t)nbytes,code,elap_time,smartfilter);1564c1564< printf("LEN=\t%"PRIi64"\n",nbytes);---> printf("LEN=\t%"PRIi64"\n",(int64_t)nbytes); |
Go ahead and build/install SARG as follows.
# ./configure
# make
# make install
# make
# make install
After SARG is installed, the configuration file can be modified to match your requirements. The following is one example of SARG configuration.
# vim /usr/local/etc/sarg.conf
1
2
3
4
5
6
| access_log /var/log/squid/access.logtemporary_dir /tmpoutput_dir /var/www/html/squid-reportsdate_format e ## We use Europian DD-MM-YYYY format here #### we don’t want multiple reports for single day/week/month ##overwrite_report yes |
Now it's time for a test run. We run sarg command in debug mode to find whether there is any error.
# sarg -x
If all goes well, sarg should analyze Squid logs, and create reports in /var/www/html/squid-reports. The reports should be visible in a web browser using the address http://<server-IP>/squid-reports/
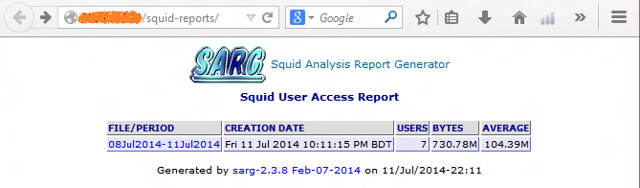
SARG can be used to create daily, weekly and monthly reports. Time range can be specified using the "-d" parameter with possible values in the form of day-n, week-n or month-n, where n is the number of days/weeks/months to jump backward. For example, with week-1, SARG will generate a report for the previous week. With day-2, SARG will prepare reports for the previous two days.
As a demonstration, we will prepare a cron job to run SARG daily.
# vim /etc/cron.daily/sarg
1
2
| #!/bin/sh/usr/local/bin/sarg -d day-1 |
The file needs a execution permission.
# chmod 755 /usr/local/bin/sarg
Now SARG should prepare daily reports about Squid-managed traffic. These reports can easily be accessed from the SARG web interface.
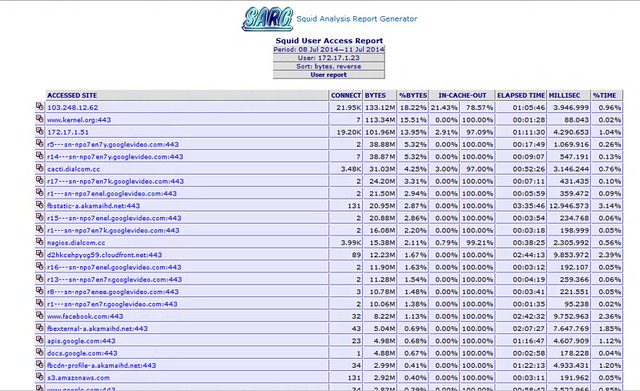
To sum up, SARG is a web based tool that analyzes Squid logs and presents the analysis in an informative way. System admins can leverage SARG to monitor what sites are being accessed, and to keep track of top visited sites and top users. This tutorial covers a working configuration for SARG. You can customize the configuration even further to match your requirements.
Hope this helps.
Comments
Post a Comment